Thursday, 11 May 2023

How to Fix Runtime Error 339: Component MSCOMCTL.OCX or one of its dependencies not correctly registered file is missing or invalid?


Hi Friends, In very rear case such type of issue you will face. If you are admin of any application LikeUnix admin/DB2 Admin/ETL Tool/HDP then you have to know about this error solution. or how this can be fixed? lets start will see step by step.

How we will Fix It?

before start the step just cross check what is your Current OS bit type 32/64 according you have plan:


1. Download the MSCOMCTL.OCX file: You can download the MSCOMCTL.OCX file from a trusted source on the internet. Make sure to download the correct version that matches your Windows operating system, whether it is 32-bit or 64-bit.

2. Copy the MSCOMCTL.OCX file to the correct directory: Once you've downloaded the MSCOMCTL.OCX file, copy it to the following directory: C:\Windows\System32 (for 32-bit Windows) or C:\Windows\SysWOW64 (for 64-bit Windows).

3. Register the MSCOMCTL.OCX file: After copying the file to the correct directory, you'll need to register it using the Command Prompt. Here are the steps:

   a. Click on the "Start" button and type "cmd" in the search bar.
   
   b. Right-click on "Command Prompt" and select "Run as administrator".
   
   c. In the Command Prompt window, type "regsvr32 MSCOMCTL.OCX" and press Enter.
   
   d. You should see a message indicating that the registration was successful.

4. Restart your computer: After registering the MSCOMCTL.OCX file, restart your computer to ensure that the changes take effect.

Once you've completed these steps, try running the program again to see if the "Runtime Error 339" has been resolved. If you continue to experience issues, it may be helpful to contact the program's support team for additional assistance.

I hope you understood this. But make a note In realtime things are very different because you are admin for particular application/Team but for this you have to take approval from multiple teams and for this condition to resolve this issue it will take 5 to 6 hr. because for to get the approval from diff. difft. team it will take too much time. also some times in other IT industry RFC required for this task.


What is MSCOMCTL.OCX ?

 MSCOMCTL.OCX is a file that contains ActiveX controls used by various programs in Windows. ActiveX is a technology developed by Microsoft that allows software components to be used and shared across different programs and platforms. MSCOMCTL.OCX contains several commonly used ActiveX controls, including the Date Picker, the Month View, and the Toolbar.

These controls are typically used in Visual Basic programs and other applications that utilize ActiveX components. They provide graphical user interface (GUI) elements that allow users to select dates, navigate through calendars, and interact with various toolbars and buttons.

MSCOMCTL.OCX is included in various versions of Microsoft Office and other Microsoft programs. It is also used by third-party applications that incorporate ActiveX controls into their software. However, if the file becomes corrupted or is missing from your system, it can cause issues with the programs that rely on it, such as the "Runtime Error 339" error message.

Where we use This MSCOMCTL.OCX?

 MSCOMCTL.OCX is used in various applications and programs that require ActiveX controls. Some of the most common programs and applications that use MSCOMCTL.OCX include:

1. Microsoft Office: MSCOMCTL.OCX is used by several versions of Microsoft Office, including Excel, Access, and Word, to provide various controls for creating user interfaces, such as date pickers, scrollbars, and toolbars.

2. Visual Basic: MSCOMCTL.OCX is commonly used in Visual Basic programming to provide ActiveX controls for developing custom user interfaces.

3. AutoCAD: AutoCAD, a popular computer-aided design software, uses MSCOMCTL.OCX to provide custom toolbars and other GUI elements for its users.

4. Adobe Acrobat: Adobe Acrobat, a PDF reader and editor, uses MSCOMCTL.OCX to provide various ActiveX controls for its user interface.

5. Various third-party applications: Many third-party applications also use MSCOMCTL.OCX to provide custom controls for their user interfaces.

Why we use this MSCOMCTL.OCX?

  MSCOMCTL.OCX is used to provide ActiveX controls for various programs and applications in Windows. ActiveX controls are software components that allow developers to create interactive graphical user interfaces (GUIs) in their applications.

MSCOMCTL.OCX specifically contains several commonly used ActiveX controls, including the Date Picker, the Month View, and the Toolbar. These controls can be used to enhance the functionality of various applications and provide users with a more interactive and user-friendly experience.

For example, the Date Picker control allows users to select a date from a calendar pop-up, rather than having to manually type in the date. The Month View control allows users to navigate through a calendar and select a date. The Toolbar control allows developers to create custom toolbars with buttons and other GUI elements that can be used to perform specific actions or tasks within an application.

Overall, the use of MSCOMCTL.OCX and its ActiveX controls can help to improve the user experience of various applications and provide developers with a powerful toolset for creating interactive and functional software.


so I suggest try to fix this issue with discuss with your manager or your lead.

Thank You. I hope you understood this topic/scenario very well.

Please Subscribe our Online IT Training youtube channel and like share our IT industry realtime related videos.

Thank You again.!

What is Snipping Tool? How to use it? Snipping tool shortcut keys?


Hi Everyone, Today we will see the very basic and very useful windows tools while working with realtime IT Industry the Snipping Tool. If you want to share any artifacts once you performed any activity like OS patching/OS Upgrade/anything then if you want to share screenshot then mostly people are using this tool. I request you please read this you will one step ahead for work in IT Industry.

 What is Snipping Tool?

The Snipping Tool is a utility program that comes with Microsoft Windows operating systems. It allows you to capture screenshots (snips) of all or part of your computer screen, and save them as an image file or copy them to the clipboard. The Snipping Tool allows you to choose from four different types of snips - free-form, rectangular, window, and full-screen - and you can annotate, highlight, and save or share your snips as needed. The Snipping Tool is a handy tool for quickly capturing and sharing information on your computer screen, and is especially useful for creating tutorials, instructional materials, or other types of visual aids/artifacts.

History Of Snipping Tool? 

The Snipping Tool was first introduced as a built-in utility in Windows Vista in 2007, and has been included in all subsequent versions of Windows, including Windows 7, Windows 8, and Windows 10.
The idea behind the Snipping Tool was to provide an easy-to-use, lightweight tool for users to capture and share screenshots of their computer screen. Prior to the Snipping Tool, users would often have to use the Print Screen key on their keyboard to capture a screenshot, and then paste it into an image editor to crop and save the image.
With the Snipping Tool, users can easily select the portion of the screen they want to capture, annotate the image with text, arrows, or other shapes, and then save or share the image directly from the tool.
Over the years, the Snipping Tool has undergone several updates and improvements, including the ability to capture screenshots of entire web pages (using the scrolling capture feature), and the ability to set a delay timer for capturing screenshots. However, it has largely remained a simple, yet effective tool for capturing and sharing screenshots on Windows systems.

Other Tools Like Snipping Tools? List?

There are several other tools similar to the Snipping Tool that allow you to capture and annotate screenshots on Windows, including:

1. Snagit: Snagit is a popular screen capture and screen recording tool that allows you to capture screenshots, record video, and annotate images with text, arrows, and other shapes.

2. Greenshot: Greenshot is a free and open-source screen capture tool that allows you to capture screenshots of your entire screen, selected regions, or individual windows, and then annotate and save the image.

3. Lightshot: Lightshot is a lightweight screen capture tool that allows you to capture screenshots of your screen, annotate the image with text or shapes, and then save or share the image.

4. ShareX: ShareX is a free and open-source screen capture and screen recording tool that allows you to capture screenshots, record video, and annotate images with text, arrows, and other shapes.

5. Windows Snip & Sketch: Windows Snip & Sketch is a newer tool included with Windows 10 that replaces the Snipping Tool. It allows you to capture screenshots, annotate the image with text, shapes, and a highlighter, and then save or share the image.

These are just a few examples of the many screen capture and annotation tools available for Windows. Each tool has its own unique features and capabilities, so it's worth exploring different options to find the one that best suits your needs.

How to Use Snipping Tool Step by Step?

Sure, here are the steps to use the Snipping Tool in Windows:

1. Open the Snipping Tool: Click on the "Start" menu and search for "Snipping Tool". Click on the app to open it.


2. Choose the type of snip: Click on the "Mode" button and select the type of snip you want to take. You can choose between free-form, rectangular, window, and full-screen snips.

3. Capture the snip: Use your mouse to select the area of the screen you want to capture. If you selected a window or full-screen snip, the capture will be taken automatically.

4. Annotate the snip (Optional): Once you've taken the snip, you can annotate it with text, a pen tool, highlighter, or other shapes. To do this, click on the "Pen" button and choose the type of annotation you want to add.

5. Save or share the snip: Once you're happy with your snip, you can save it as an image file or copy it to the clipboard. Click on the "File" menu and select "Save As" to save the snip, or click on the "Edit" menu and select "Copy" to copy it to the clipboard. You can then paste the snip into another application or share it with others.

That's it! These are the basic steps to use the Snipping Tool in Windows. Keep in mind that the exact steps may vary depending on the version of Windows you're using, but the basic process should be similar.

Very Useful Shortcut Keys For Snipping Tools?

Here are some shortcut keys associated with the Snipping Tool in Windows:

1. Windows Key + Shift + S: This shortcut key allows you to open the Snipping Tool in a special mode that lets you select a portion of your screen to capture. This mode is called "Snip & Sketch" and is available in Windows 10.


2. Alt + M: This shortcut key allows you to choose the type of snip you want to capture. When you press Alt + M, you'll see a menu that allows you to choose between free-form, rectangular, window, and full-screen snips.

3. Ctrl + C: This shortcut key allows you to copy the current snip to the clipboard. You can then paste the snip into another application, such as an image editor or email client.

4. Ctrl + S: This shortcut key allows you to save the current snip to a file. When you press Ctrl + S, you'll be prompted to choose a file format and location to save the snip.

5. Ctrl + Z: This shortcut key allows you to undo the last annotation you made on the current snip. You can use Ctrl + Z to undo text, shapes, or other annotations.

6. Ctrl + N: This shortcut key allows you to create a new snip. When you press Ctrl + N, the Snipping Tool window will reset to its default state, allowing you to capture a new snip.

These shortcut keys can help you use the Snipping Tool more efficiently and quickly.


Benifits and Drawback of Snipping Tools?

As you know any application has benifits and its drawback so snipping tools has also some limitation which is please read this.


Benefits:
1. Quick and easy: The Snipping Tool is a simple and straightforward tool that allows you to capture screenshots of your screen quickly and easily, without the need for additional software or complicated settings.

2. Customizable snips: The Snipping Tool allows you to select different types of snips, including free-form, rectangular, window, and full-screen, and you can also set a delay timer to capture menus and tooltips.

3. Annotation and sharing: You can annotate your snips with text, arrows, and other shapes, and then save or share them directly from the Snipping Tool. This makes it a useful tool for creating tutorials, instructional materials, or other types of visual aids.

4. Built-in tool: The Snipping Tool is a built-in tool that comes with Windows, so you don't need to install any additional software to use it.

Drawbacks:
1. Limited features: While the Snipping Tool is useful for capturing and annotating screenshots, it has limited features compared to more advanced screen capture tools. For example, it doesn't have the ability to capture scrolling windows or record video.

2. Limited file formats: The Snipping Tool only allows you to save snips as image files, such as JPEG, PNG, and GIF. If you need to save your snips in other file formats, you'll need to use an additional image editor.

3. Limited editing capabilities: While you can annotate your snips with text, arrows, and other shapes, the Snipping Tool doesn't have advanced editing capabilities, such as layer support or advanced image manipulation tools.

4. Limited compatibility: The Snipping Tool is only available on Windows operating systems, so if you use a different operating system, you'll need to find an alternative screen capture tool. 

Now I Hope you know Everything about Snipping Tool. Now you can Handon on this.

Thanks You! Please visit our Youtube Channel Also To learn New IT/Software Industry New things.

Channel name: Online IT Training.


Saturday, 6 May 2023

What is GlobalProtect? How to use it?


GlobalProtect Application

Hi everyone, good to see you back. Most of the IT company and organizations are using such type of application to do there private network into there business. so today's we will see about GlobalProtect.

Your all doubt and concept will clear in this topic.

What is GlobalProtect?

GlobalProtect is a virtual private network (VPN) solution developed by Palo Alto Networks. It provides secure remote access to an organization's network resources by creating a secure connection between a user's device and the organization's network. 

GlobalProtect is used to protect data and resources by encrypting traffic between the user's device and the organization's network, which helps prevent unauthorized access or interception. It can also enforce security policies on the user's device, such as verifying the presence of antivirus software or limiting access to specific applications or resources.


GlobalProtect is available for a variety of platforms, including Windows, macOS, Linux, iOS, and Android. It can be used to connect to a wide range of network resources, including web applications, file shares, and email servers.

Who Developed the GlobalProtect?

GlobalProtect was developed by Palo Alto Networks, a cybersecurity company based in Santa Clara, California, United States. The company specializes in network security products and services, including firewalls, cloud security, endpoint protection, and threat intelligence. GlobalProtect is one of Palo Alto Networks' flagship products, and it has become a popular solution for secure remote access and endpoint protection.

On which programming language GlobalProtect built?

The GlobalProtect VPN solution is composed of multiple components, and different programming languages are likely used to develop each of them. 

The backend infrastructure, including the VPN gateways and management servers, is likely written in a combination of low-level languages such as C or C++ for performance and security reasons.

The GlobalProtect client software that runs on end-user devices is likely written in a higher-level language such as Java or C# to allow for cross-platform compatibility and ease of development.

In addition, web-based management interfaces and dashboards may be built using web development languages such as HTML, CSS, and JavaScript.

It's important to note that the exact programming languages and technologies used in the development of GlobalProtect are not publicly disclosed by Palo Alto Networks, and they may change over time as the product evolves.

Short History of GlobalProtect?

GlobalProtect was first introduced by Palo Alto Networks in 2013 as a secure remote access solution for its next-generation firewall platforms. The solution was designed to provide secure access to corporate resources for remote employees and mobile devices, while also enforcing security policies and protecting against cyber threats.

Since its initial release, GlobalProtect has undergone several updates and enhancements. In 2014, Palo Alto Networks added support for mobile devices running iOS and Android, enabling secure remote access from smartphones and tablets. In 2015, the company introduced GlobalProtect Cloud Service, which provided a cloud-based alternative to on-premises VPN gateways.

Over the years, GlobalProtect has continued to evolve with new features and capabilities. For example, in 2019, Palo Alto Networks announced the integration of GlobalProtect with Prisma Access, its cloud-delivered security platform, to provide a more comprehensive and unified approach to secure access and protection for remote users.

Today, GlobalProtect is widely used by organizations of all sizes and industries as a secure remote access solution, enabling employees and partners to access corporate resources from anywhere in the world while maintaining strong security and compliance.

How to Use GlobalProtect Step By Step?

The specific steps to use GlobalProtect may vary depending on the specific configuration and settings of your organization's deployment. However, here is a general outline of the steps involved in using GlobalProtect to connect to your organization's network:


1. Download and install the GlobalProtect client software: Depending on your organization's policies, you may be required to download and install the GlobalProtect client software on your device. This software is typically available on your organization's network or VPN portal.

As show in above img. just search global in click on search result.

2. Launch the GlobalProtect client: Once the software is installed, launch the GlobalProtect client and enter your credentials, including your username and password.

as shown in fig just select required gateway as per availability. recommended option best available

3. Connect to the VPN gateway: After entering your credentials, select the VPN gateway or server you want to connect to. This may be a specific server or location, depending on your organization's configuration.

4. Establish a secure connection: After selecting the VPN gateway, GlobalProtect will initiate a secure connection and authenticate your device. This process may take a few seconds or minutes to complete.

5. Access network resources: Once the connection is established, you can access your organization's network resources, such as files, applications, or data. You may be required to authenticate again using your network credentials, depending on your organization's policies.

Once you got this window fill the correct credential given by your respective organization and click to connect. you will connect successfully.

Note: All Links are depends on its organizations security level. I given just an example of onlinekida.com in above fig.

6. Disconnect from the VPN: When you're done accessing network resources, disconnect from the VPN by closing the GlobalProtect client or clicking the disconnect button.

Note: - It's important to follow your organization's policies and guidelines when using GlobalProtect, and to keep your device and software up-to-date with the latest security patches and updates. If you encounter any issues or problems when using GlobalProtect, contact your organization's IT support team for assistance.

What are Benefit's and Drawback's of GlobalProtect?

GlobalProtect offers several benefits to organizations that need to provide secure remote access to their network resources:

Benefits:

1. Enhanced security: GlobalProtect provides a secure connection between remote devices and the organization's network, using encryption and authentication to prevent unauthorized access or interception of sensitive data.

2. Access control: GlobalProtect enables organizations to control access to specific network resources, applications, or data based on user identity, device type, or location.

3. Compliance: GlobalProtect can help organizations comply with regulatory requirements and industry standards for data privacy and security, such as GDPR, HIPAA, or PCI DSS.

4. Ease of use: GlobalProtect provides a user-friendly interface for end-users, making it easy to connect to the corporate network and access resources securely.

However, there are also some potential drawbacks or challenges associated with using GlobalProtect:

Drawbacks:

1. Cost: Implementing and maintaining GlobalProtect can require a significant investment in hardware, software, and IT resources, which may be a challenge for smaller organizations.

2. Complexity: GlobalProtect is a complex solution that requires specialized knowledge and skills to deploy and manage effectively, which may be a challenge for some IT teams.

3. Performance: GlobalProtect can introduce latency and overhead due to the encryption and decryption of network traffic, which may impact the performance of some applications or services.

4. Reliability: Like any IT solution, GlobalProtect can experience technical issues or disruptions that can affect the availability or performance of network resources, which may be a challenge for organizations that rely heavily on remote access. 

Overall, the benefits of GlobalProtect can outweigh the potential drawbacks for many organizations, but it's important to carefully evaluate the solution and its requirements before making a decision.

List of all other application work like GlobalProtect?

There are several other virtual private network (VPN) solutions that provide similar functionality to GlobalProtect, including:

1. Cisco AnyConnect: This is a VPN solution developed by Cisco Systems, which provides secure remote access to network resources and enables endpoint protection and policy enforcement.

2. Fortinet FortiClient: This is a VPN solution developed by Fortinet, which provides secure remote access and endpoint protection, and includes features such as web filtering and application control.

3. OpenVPN: This is an open-source VPN solution that provides secure remote access and site-to-site connectivity, and is highly customizable and flexible.

4. Pulse Secure: This is a VPN solution developed by Pulse Secure, which provides secure remote access and endpoint protection, and includes features such as secure access to cloud applications and single sign-on.

5. Microsoft Always On VPN: This is a VPN solution built into Windows 10, which provides secure remote access and endpoint protection, and can be integrated with Microsoft Endpoint Manager for policy enforcement and management.

These are just a few examples of VPN solutions that provide similar functionality to GlobalProtect, and there are many others available in the market. It's important to carefully evaluate each solution and its features to determine which one best meets your organization's needs.

Thanks for Reading this useful information. I hope now you perfect in this GlobalProtect concept. Be with us for next Hot topics of Real time IT(Software) Industry tools topics. We required your supports.


What is VPN? How to use Cisco AnyConnect Secure Mobility Client ?

 VPN (Virtual Private Network)

Hi everyone good to see you back, Today's we will see very important concept most of the IT company and other all organization are using its own VPN Network. So Today will cover all about VPN, everything I promise once you read this you will easily able to connect VPN and your all doubt/concept will clear perfectly. Today will cover about Cisco AnyConnect Secure Mobility Client ?

What Is VPN ?

VPN stands for Virtual Private Network. It is a type of secure and encrypted network connection that allows users to access the internet or a private network remotely through a public network, such as the internet. When you use a VPN, your internet traffic is routed through an encrypted tunnel between your device and the VPN server. This makes it much harder for anyone to intercept or monitor your online activities, as your data is encrypted and protected form.

How Does VPN Work?

VPN works by creating a secure and encrypted connection between your device (such as a computer or smartphone) and a VPN server. This connection is established through a VPN client software or app installed on your device.
When you connect to a VPN server, your device sends encrypted data through an encrypted tunnel to the server, which then decrypts the data and forwards it to its destination. This means that anyone trying to intercept or monitor your internet traffic will only see encrypted data, making it much harder to snoop on your online activities.

History of VPN ?

The history of VPNs dates back to the late 1990s, when the first VPN protocols were developed. The initial purpose of VPNs was to provide a secure and encrypted network connection for remote workers and businesses to access corporate networks and resources from outside the office.

The first VPN protocol was Point-to-Point Tunneling Protocol (PPTP), which was developed by Microsoft in 1996. PPTP created a secure and encrypted connection between a remote user's device and a corporate network by encapsulating the data packets within a GRE (Generic Routing Encapsulation) tunnel.

In the early 2000s, another VPN protocol called Layer 2 Tunneling Protocol (L2TP) was developed. L2TP combined the features of PPTP and another protocol called L2F (Layer 2 Forwarding Protocol) to provide enhanced security and reliability.

In 1999, the open-source VPN protocol OpenVPN was developed, which became a popular alternative to proprietary VPN protocols like PPTP and L2TP. OpenVPN used SSL/TLS (Secure Sockets Layer/Transport Layer Security) encryption to create a secure and encrypted connection between a user's device and a VPN server.

Over the years, VPNs have become increasingly popular among individuals and organizations as a way to enhance online privacy and security, and to bypass restrictions on accessing content. Today, there are many different VPN providers and protocols available, with varying levels of security, privacy, and performance features.

List Of VPN that wildly used?

There are many VPN providers available, each with their own features and pricing plans. Here are some popular VPN services:

1. NordVPN

2. ExpressVPN

3. Surfshark

4. CyberGhost VPN

5. Private Internet Access (PIA)

6. ProtonVPN

7. IPVanish

8. Hotspot Shield

9. TunnelBear

10. Windscribe

11. Cisco AnyConnect Secure Mobility Client

What is Cisco AnyConnect Secure Mobility Client ?

Cisco AnyConnect Secure Mobility Client is a VPN client software developed by Cisco Systems. It provides secure and encrypted remote access to enterprise networks for users who are working outside the office or from a remote location. The software can be installed on Windows, macOS, Linux, and mobile devices such as iOS and Android.


The AnyConnect Secure Mobility Client uses various VPN protocols to create a secure and encrypted connection between the user's device and the enterprise network. These protocols include SSL (Secure Sockets Layer), TLS (Transport Layer Security), and DTLS (Datagram Transport Layer Security). The client also includes advanced features such as two-factor authentication, endpoint assessment, and web security.
AnyConnect is commonly used by large organizations and businesses to provide secure remote access to their employees, contractors, and partners. It enables users to securely access company resources such as email, file servers, and business applications from anywhere in the world. Additionally, AnyConnect allows administrators to enforce security policies and monitor network traffic to ensure the security and integrity of the enterprise network.

History of Cisco AnyConnect Secure Mobility Client ?

Cisco AnyConnect Secure Mobility Client was first released in 2010, as a replacement for Cisco's previous VPN client, Cisco VPN Client. The new client was designed to provide enhanced security, improved performance, and a better user experience.

AnyConnect was built on a modular architecture that allowed for greater flexibility and customization. The client also included support for advanced VPN features such as SSL, TLS, and DTLS, as well as support for IPv6, which was becoming increasingly important as the number of devices and users on the internet continued to grow.
Over the years, AnyConnect has continued to evolve and add new features. In 2012, Cisco introduced a feature called Secure Mobility, which enabled the client to automatically detect when a user was accessing the network from an unsecured location and adjust its security settings accordingly.

In 2013, Cisco added support for the new Cisco ASA 5500-X Series Next-Generation Firewall, which provided enhanced security features and improved performance. And in 2015, Cisco introduced a new version of AnyConnect that included support for Cisco's Identity Services Engine (ISE), which allowed for more granular control over network access and security.

Today, AnyConnect remains one of the most popular VPN clients used by enterprises and organizations around the world, offering a comprehensive suite of security and connectivity features for remote access to enterprise networks.

Who Invented By Cisco AnyConnect Secure Mobility Client ?

Cisco AnyConnect Secure Mobility Client was developed by Cisco Systems, Inc., a multinational technology company based in the United States. While the client was likely developed by a team of software engineers and developers within the company, there is no single individual who is credited with inventing it. The first version of AnyConnect was released in 2004, and since then it has gone through several iterations and updates to become the robust and widely-used VPN client that it is today.

On Which Programming Language Cisco AnyConnect Secure Mobility Client Developed?

Cisco AnyConnect Secure Mobility Client is primarily written in the programming language C++. However, like most modern software applications, AnyConnect likely includes components written in other programming languages as well, such as Python, Java, and assembly language. Additionally, the client may include scripting languages such as JavaScript or PowerShell for performing various tasks or automating certain functions.

How does It Work?(Cisco AnyConnect Secure Mobility Client )

Cisco AnyConnect Secure Mobility Client works by establishing a secure, encrypted tunnel between the user's device and the enterprise network. The client uses various VPN protocols, such as SSL, TLS, and DTLS, to create this secure connection.

When a user launches the AnyConnect client and connects to a VPN server, the client first authenticates the user's credentials using a variety of methods, such as digital certificates, smart cards, or two-factor authentication. Once authenticated, the client establishes a secure tunnel to the VPN server using the selected protocol. The client then creates a virtual network interface on the user's device that appears to the user as a regular network connection.

All network traffic sent and received by the user's device is encrypted and sent through the secure tunnel to the VPN server. The VPN server decrypts the traffic and forwards it to its intended destination within the enterprise network. Similarly, traffic from the enterprise network is encrypted and sent back through the secure tunnel to the user's device, where it is decrypted and delivered to the appropriate application.

AnyConnect also includes features for endpoint assessment, which can check the security posture of the user's device before allowing it to connect to the network. This can include checking for the presence of antivirus software, verifying that the operating system is up to date, and checking for any known security vulnerabilities.

How to Use/Connect with Cisco AnyConnect Secure Mobility Client ?

Hi Cisco AnyConnect Secure Mobility Client connection is very simple, If you are using your office laptop first time you have to download application from company portal Link.

Once download finish you have Install it. Once Install finish. Make following settings on your system.

I am giving for Windows OS. see the fig.

Step1: just search into search bar and type VPN, goto VPN Setting 


Just Enable app VPN option.

Step2: Open your Cisco AnyConnect Secure Mobility Client app and click on setting.


Step3: Now click on the VPN and check overview of VPN

Step4: Click on VPN Preferences. and click on required option bar.

Step 5: Clear the all Msg history.


Step 6: Open Your Cisco AnyConnect Secure Mobility Client again
and Put your required private web link/IP address provided by your organization.
In our case onlinekida.com is link and its domain id is online123 you have to enter all details as per your organization provide by you.

Step 7: Once you put all required credentials you will get below alert msg.
Just click on accept button.


Step 8: Once you accept this you will be successfully connected to your company VPN network.


Step 9: If You want to disconnect from your VPN network just click on Disconnect Button.

I hope you clearly understand the connection process of Cisco AnyConnect Secure Mobility Client.

Benefits & Drawbacks of Cisco AnyConnect Secure Mobility Client?

Benefits of Cisco AnyConnect Secure Mobility Client:

1. Enhanced security: AnyConnect provides advanced security features, including strong encryption protocols, two-factor authentication, and web security capabilities, that help ensure the confidentiality, integrity, and availability of data transmitted over a VPN connection.

2. Flexible deployment options: AnyConnect can be deployed on a variety of platforms, including Windows, macOS, Linux, iOS, and Android, making it a highly versatile VPN client that can be used by a wide range of users and devices.

3. Improved user experience: AnyConnect includes a user-friendly interface that simplifies the process of connecting to a VPN, and provides a seamless user experience that is optimized for both desktop and mobile devices.

4. Endpoint assessment: AnyConnect includes features for endpoint assessment that help ensure that the user's device is secure and compliant with organizational policies before allowing it to connect to the network.

5. Remote access to enterprise resources: AnyConnect allows users to securely access enterprise resources from anywhere in the world, enabling remote work and improving productivity.

Drawbacks of Cisco AnyConnect Secure Mobility Client:

1. Complexity: The AnyConnect client can be complex to deploy and configure, especially for organizations with complex network infrastructures.

2. Performance: Because AnyConnect relies on encryption to secure network traffic, it can potentially slow down network performance, especially on slower or older devices.

3. Cost: AnyConnect is a commercial VPN solution, and as such, requires a licensing fee to use, which can be expensive for smaller organizations.

4. Compatibility issues: AnyConnect may not be compatible with all devices or operating systems, and may require additional configuration or customization to work properly on some systems.

List of other applications like Cisco AnyConnect Secure Mobility Client ?

There are several other VPN clients available for Windows that you can use instead of Cisco AnyConnect Secure Mobility Client. Here are a few examples:

1. OpenVPN: OpenVPN is a popular open-source VPN client that can be used on Windows, macOS, Linux, and Android. It supports a wide range of encryption protocols and has a reputation for being highly secure and reliable.

2. ExpressVPN: ExpressVPN is a commercial VPN client that provides fast and secure access to servers in over 90 countries. It offers a user-friendly interface and strong security features, including encryption and a kill switch.

3. NordVPN: NordVPN is another commercial VPN client that provides fast and secure access to servers in over 60 countries. It includes features such as double VPN, which routes traffic through two servers for added security, and a strict no-logs policy.

4. CyberGhost VPN: CyberGhost VPN is a commercial VPN client that provides access to servers in over 90 countries. It includes features such as ad-blocking, malware protection, and automatic HTTPS redirection.

5. ProtonVPN: ProtonVPN is a VPN client developed by the creators of ProtonMail, a secure email service. It includes strong encryption and a strict no-logs policy, and offers a free version with limited features.


Thanks for Reading this useful information. I hope now you perfect in this VPN concept. Be with us for next Hot topics of Real time IT(Software) Industry tools topics. We required your supports.


Friday, 5 May 2023

How to use Remote Desktop Connection? What is Remote Desktop Connection? RDC

 Hello Everyone, Good to see you back, Today's topic is Remote Desktop Connection and I Promise you will become like Pro once you read this carefully.


Before going to direct how to use Remote Desktop first of all we will see everything about Remote Desktop Like It's History, Why use it everything will see one by one.

What is Remote Desktop Connection?

A remote desktop application is a software tool that allows a user to connect to and control a computer or server from a remote location. With a remote desktop application, you can access and control a computer or server from anywhere in the world, as long as you have an internet connection.


The remote desktop application typically consists of two components: a client application that runs on the local computer or device and a server application that runs on the remote computer or server. The client application connects to the server application over the internet and allows the user to view and control the remote computer's desktop as if they were sitting in front of it.

History of  Remote Desktop Connection?

The history of remote desktop connection dates back to the early 1990s, when Microsoft introduced the Remote Desktop Protocol (RDP) as part of their Windows NT 4.0 operating system. RDP was designed to allow users to remotely access and control another computer over a network connection.

The first version of RDP, released in 1996, was limited in its capabilities and required significant bandwidth to transmit data over the network. However, subsequent versions of RDP introduced improvements in performance and functionality, including support for multimedia and bi-directional audio.
In 2001, Microsoft introduced Remote Desktop Connection (RDC), a client software that allows users to connect to remote computers running Windows operating systems. RDC replaced the previous remote desktop client, Terminal Services Client (TSC), and introduced several new features, including support for multiple monitors, clipboard redirection, and printing.

Over the years, Microsoft has continued to improve and refine RDP and RDC, with the most recent version of RDP, RDP 10, released in 2018. RDP is now widely used in corporate environments for remote support, remote work, and collaboration.

In addition to Microsoft's RDP, there are also other remote desktop connection protocols and applications available, including VNC, TeamViewer, and AnyDesk. However, RDP remains a popular and widely-used option for remote desktop connection due to its integration with the Windows operating system and its robust security features.

Why we use Remote Desktop Connection?
Remote Desktop Connection is used for a variety of purposes, including:

1. Remote Access: Remote Desktop Connection allows users to access their office or home computer from a remote location, which is useful for employees who work from home or travel frequently. Remote access also enables IT support staff to troubleshoot issues on remote computers without needing to physically visit the computer.

2. Collaboration: Remote Desktop Connection enables multiple users to access and work on a single computer simultaneously, which can be useful for collaborative work and training sessions.

3. File Sharing: Remote Desktop Connection enables users to transfer files between the local and remote computers, which can be useful for sharing documents, photos, and other files.

4. Security: Remote Desktop Connection can be used to securely access and control remote computers, which can be especially important for sensitive applications and data.

5. Flexibility: Remote Desktop Connection provides users with flexibility and convenience, allowing them to access their computer and work from anywhere with an internet connection.

Who can Use Remote Desktop Connection?

Remote Desktop Connection can be used by anyone who needs to remotely access and control a computer over a network or the internet. Some of the common use cases for Remote Desktop Connection include:


1. Remote workers: Remote workers can use Remote Desktop Connection to access their office computer from a remote location, allowing them to work from home or other remote locations.

2. IT support staff: IT support staff can use Remote Desktop Connection to remotely troubleshoot and resolve issues on remote computers without needing to physically visit the computer.

3. Collaboration: Remote Desktop Connection enables multiple users to access and work on a single computer simultaneously, which can be useful for collaborative work and training sessions.

4. Students and educators: Remote Desktop Connection can be used in education settings to provide students and educators with remote access to computer resources and applications.

5. Businesses: Remote Desktop Connection can be used by businesses to provide employees with access to remote resources and applications, as well as to facilitate collaboration and remote work.

On Which language Remote Desktop Connection design?

Remote Desktop Connection is a software application developed by Microsoft, and it is primarily designed using the programming languages C++ and C#. C++ is a powerful, high-performance language that is commonly used for system-level programming, while C# is a modern, object-oriented language designed for developing applications on the .NET Framework.

The Remote Desktop Protocol (RDP), which is the protocol used by Remote Desktop Connection to establish a remote connection between two computers, is also designed using C++. RDP is optimized for performance and efficiency, which is critical for providing a seamless remote desktop experience.

How to Use Remote Desktop Connection? Step by Step?

Here We are providing Real time example to access your Remote Desktop Connection application.

these are the steps to use Remote Desktop Connection:

1. Ensure that your computer is set up for remote desktop connections: Before you can use Remote Desktop Connection, you must enable remote connections on your computer. To do this, go to the System settings on your computer and select "Remote Desktop". Ensure that the "Allow remote connections to this computer" option is selected.

2. Obtain the IP address or computer name of the remote computer: To connect to a remote computer, you need to know its IP address or computer name. You can obtain this information from the remote computer's user or IT support staff.


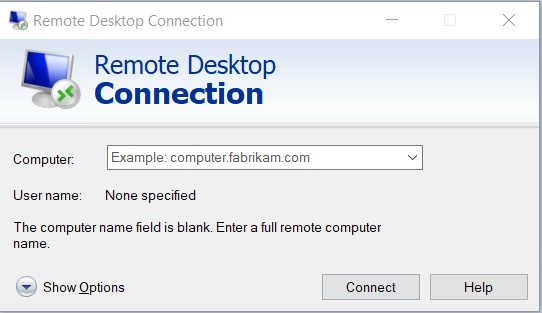
3. Launch the Remote Desktop Connection application: On your local computer, launch the Remote Desktop Connection application. You can typically find this application by searching for "Remote Desktop Connection" in the Start menu.


4. Enter the IP address or computer name of the remote computer: In the Remote Desktop Connection window, enter the IP address or computer name of the remote computer that you want to connect to.


5. Enter your credentials: In the Remote Desktop Connection window, enter your username and password for the remote computer. Ensure that you have the appropriate permissions to access the remote computer.


6. Connect to the remote computer: Click the "Connect" button in the Remote Desktop Connection window to connect to the remote computer. If this is your first time connecting to the remote computer, you may need to accept a security warning before the connection is established.

Once you enter correct credentials then at last it will ask to Ok for connection. Please do it Ok and enjoy your Remote connection. 


7. Use the remote computer: Once the connection is established, you can use the remote computer as if you were sitting in front of it. You can run applications, access files, and perform other tasks on the remote computer.

8. Disconnect from the remote computer: When you are finished using the remote computer, click the "X" button in the Remote Desktop Connection window to disconnect from the remote computer.


What are Benefits and Drawbacks of Remote Desktop Connection?

Remote Desktop Connection has several benefits and drawbacks, which are listed below:

Benefits:

1. Remote access: Remote Desktop Connection allows users to remotely access and control another computer over the internet or a local network, which can be helpful in a variety of situations.

2. Increased productivity: Remote Desktop Connection can increase productivity by allowing users to access and work on their computers from anywhere, at any time.

3. Cost savings: Remote Desktop Connection can reduce costs by eliminating the need for physical travel to remote locations and by enabling remote IT support.

4. Centralized management: Remote Desktop Connection can simplify IT management by allowing IT administrators to manage multiple computers and users from a single location.

5. Enhanced security: Remote Desktop Connection can improve security by allowing users to access their computers remotely without the need for physical access, which can reduce the risk of theft, loss, or damage to the computer.

Drawbacks:

1. Security risks: Remote Desktop Connection can pose security risks if not properly secured, including the risk of unauthorized access and data breaches.

2. Performance issues: Remote Desktop Connection performance can be affected by factors such as network latency, bandwidth limitations, and the performance of the remote computer.

3. Compatibility issues: Remote Desktop Connection may not be compatible with all applications or operating systems, which can limit its usefulness in certain situations.

4. Network reliability: Remote Desktop Connection relies on network connectivity, which can be affected by factors such as network outages, congestion, and bandwidth limitations.

5. User error: Remote Desktop Connection can be affected by user error, such as misconfigured settings or incorrect credentials, which can result in connection issues or security vulnerabilities.

How Does Remote Desktop Connection Work?

Remote Desktop Connection works by allowing a user to connect to and control another computer remotely over a network connection. The connection is made using the Remote Desktop Protocol (RDP), which is built into Windows operating systems.

Here is a step-by-step explanation of how Remote Desktop Connection works:


1. Enable Remote Desktop on the remote computer: The user must first enable Remote Desktop on the computer that they want to connect to. This can be done by going to the System Properties in the Control Panel and selecting the Remote tab.

2. Connect to the remote computer: The user can then connect to the remote computer using Remote Desktop Connection, which is built into Windows. They will need to enter the IP address or hostname of the remote computer and their login credentials.

3. Authentication: Once connected, the user's credentials will be authenticated, and they will be granted access to the remote computer.

4. Remote control: The user can then remotely control the remote computer, including accessing files, running applications, and performing other tasks as if they were physically sitting in front of the computer.

5. Terminate the connection: Once the user is done working on the remote computer, they can terminate the connection using Remote Desktop Connection.

Remote Desktop Connection uses encryption to secure the connection between the two computers, and the remote computer can be accessed from anywhere over a network connection. It is important to ensure that the remote computer is properly secured, and that Remote Desktop is only enabled for authorized users.

Which are list of application like Remote Desktop Connection?

There are several applications like Remote Desktop Connection that allow users to remotely access and control other computers. Some of the popular alternatives include:

1. TeamViewer: TeamViewer is a remote access and support software that allows users to connect to and control other computers over the internet.

2. VNC Connect: VNC Connect is a remote access software that allows users to access and control other computers over the internet.

3. AnyDesk: AnyDesk is a remote desktop software that allows users to access and control other computers over the internet.

4. LogMeIn: LogMeIn is a remote access software that allows users to access and control other computers over the internet.

5. Chrome Remote Desktop: Chrome Remote Desktop is a web-based remote desktop software that allows users to access and control other computers through a web browser.


Thanks for Reading this useful information. Keep with us for new upcoming useful real time IT(Software) Industry tools posts.